Introduction
Displaying the dialog box on the UI is one of the common scenario of capturing user input in frontend application. It was not that easy to display a modal popup. We had to use third party library like jquery to work with modals. It was also achieved by custom implementation using div and playing around with z-index to display the modal.
Internet Explorer used to give us a way to work with modal pop up using window.showModalDialog().
However window.showModalDialog is not supported by chrome and other modern browsers.
I had written a post on Understanding Polyfill JavaScript with window.ShowModalDialog(). We had discussed about what polyfill is and how the polyfill for window.showModalDialog() can be used to work with showModalDialog() on modern browsers.
In this post we will see the implementation of a modal popup or just a popup using the <dialog> element
in HTML. This is a new feature and not all browsers supports this feature.
<dialog> element gives us a native way of implementing popup. We do not need third party tools or
need not write lots of custom code to work with popups.
The implementation is fairly simple with less amount of code.
Browser Support
The <dialog> element is supported by latest versions of common modern browsers. The picture below gives
a fair idea of the supported versions of different browser at the time of writing this article.
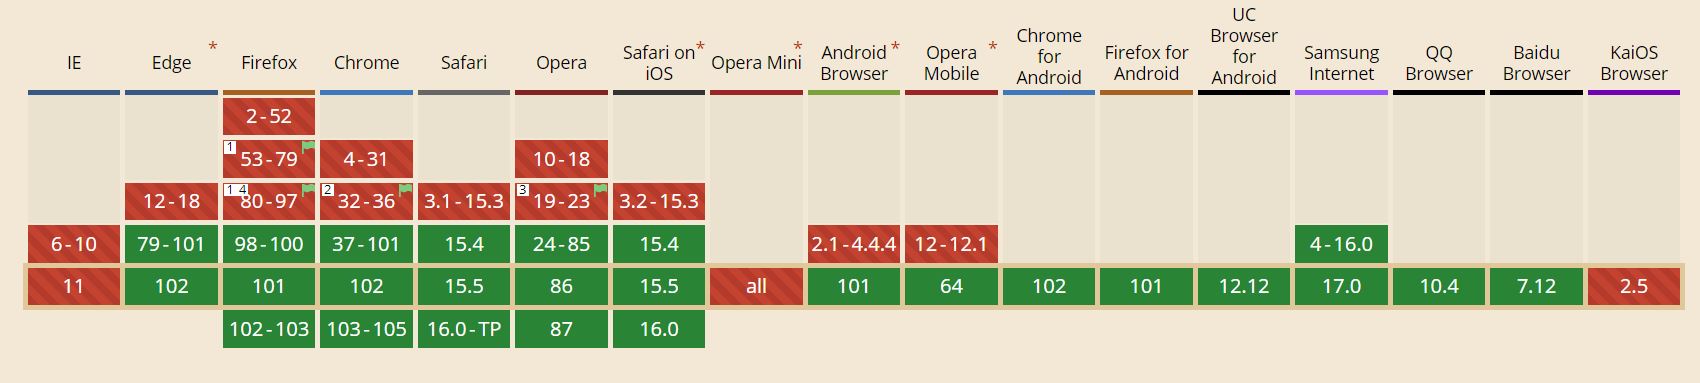
You can always refer to the source to check the current status of browser support from caniuse.com.
There is also a dialog polyfill for the <dialog> that could be used for browsers which are yet to support this feature.
HTMLDialogElement Interface
Let us now uncover the properties and methods supported by the HTMLDialogElement Interface. This interface
inherits the properties, methods and events from the parent HTMLElement Interface.
Properties
There are two important properties exposed to work with the HTMLDialogElement.
-
open - This is a boolean property.The dialog is visible on the screen when this property is set on the dialog element. The dialog api methods sets this property to true or false. If true the dialog is available for user interaction. If the property is set to false the dialog is not available for user interaction. The property can also be manually set on the element however using the api methods is a preferred way to set this property.
-
returnValue - When the user interacts with the dialog we might need to send some data to the calling screen. This is a string property that returns the value to the parent document.
Methods
There are three important methods to interact with the dialog element.
- show() - This method gives the non modal dialog for the user interaction. The user can work on both
the dialog and the screen content outside the dialog.
This is quite handy for scenarios where the user wants to some data from the dialog and enter is on the area outside of the dialog.
This method sets the open property on the dialog element.
- showModal() - This methid gives the modal dialog for the user interaction. The user can only work on the dialog area and the content outside of the dialog area is inaccessible or not editable. We can use the dialog::backdrop pseudo-element to style the area outside of the dialog. We can play around with the opacity to show/hide the content outside dialog.
This method sets the open property on the dialog element similar to the show() method.
- close([returnValue]) - This method is used to close the dialog. It also takes an optional string value as
a parameter which is used to set the
returnValueproperty of the dialog element.
This method removes the open property on the dialog element making the dialog unavailable.
Example
Now that we are familier with the properties and methods of the dialog element let us implement modal popup with the dialog element.
Create a file index.html in your code editor and paste the code below.
index.html
<!DOCTYPE html>
<html lang="en">
<head>
<meta charset="UTF-8">
<meta http-equiv="X-UA-Compatible" content="IE=edge">
<meta name="viewport" content="width=device-width, initial-scale=1.0">
<link rel="stylesheet" href="index.css"/>
<title>Dialog Element in HTML</title>
</head>
<body>
<label for="">List of Users</label>
<ul id="userList"></ul>
<button id="add">Add User</button>
<dialog id="dialog">
<h3>Add User</h3>
<form method="dialog">
<input type="text" id="username" placeholder="Enter the username"/>
<button>Submit</button>
</form>
</dialog>
<script src="index.js"></script>
</body>
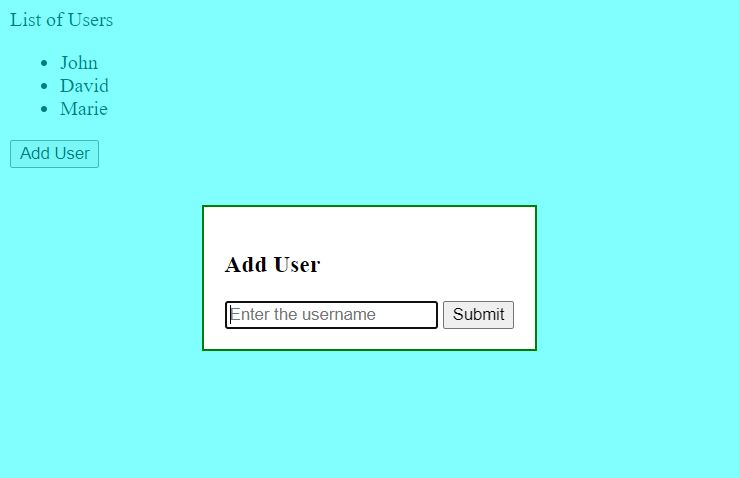
</html>As you can see we have created a basic html page with <ul> element which will display the list of Users
being captured from our modal dialog.
The dialog element has a form with the method="dialog". This is the special case with the dialog element.
A form method "dialog" closes the dialog on button click. If we do not have the form in the dialog with method="dialog"
it will not be closed on click of the button.
Since our html references a javascript file and css file let us create index.js and index.css in the same folder.
index.js
const add = document.getElementById("add");
let userList = document.getElementById("userList");
const dialog = document.querySelector("dialog");
const username = dialog.querySelector("#username");
add.addEventListener("click", function (e) {
  dialog.querySelector("form").reset();
  dialog.showModal();
});

dialog.addEventListener("close", function (e) {
  dialog.returnValue = username.value;
  var li = document.createElement("li");
  li.innerText = dialog.returnValue;
  userList.appendChild(li);
});
The code above is pretty straightforward. Here is the explanation of what is going on.
Get the reference of the Add User button and store it in add. Similary we get the references of the
<ul> , <dialog> and the username textbox.
Attach a click event listener to the add button and invoke the showModal() method to display the
dialog to the user.
Note that we are resetting the form to clear previously entered values using the reset() method.
When the Submit button of the dialog is clicked the close event of the dialog gets triggered and
we create an <li> element and append it to the <ul> populating the innerText as the username entered
from the dialog.
Styling the dialog and the backdrop for modal
As we have already created and referenced the index.css file in our html let us now copy the below code
in the index.css file.
index.css
dialog{
    border: 2px solid;
    border-color: green;
}
dialog::backdrop{
    border: 0;
    background-color: aqua;
    opacity: .5;
}
The dialog element in html comes with a particular style. eg. The dialog has a black border. We can
overwrite the default style of the dialog element with our own css.
As per the code above we have overwritten the border of the dialog with green color and 2px solid style.
The dialog element has a pseudo-element ::backdrop which is used to style the backdrop only in case
modal popup. This is quite handy with cutomizing the css of the backdrop of the dialog element.
The source code can be found here Dialog Example
Conclusion
<dialog> element has made the implementation of popup and modal pop up very simple thus making it very
easy for developers to implement it in their application.
The <dialog> has got very few but powerful properties and methods for users to interact with the dialog.
This reduces the amount of code and the complexity of implementation while using third party libraries.
It is important to note the browsers support and polyfilling the dialog element for browsers which do
not support it yet.
Thank you for reading and see you in the next post !👋