
In this post we are going to see how a react app works in a web browser. React needs no introduction to most of us. It has been there in the market since 2013. Today a wide range of applications are built with react. It is a javascript library for building UI elements where the heavy lifting of presenting the data is done in the browser. A react application has just one index.html that gets loaded into the browser initally and all other rendering is done within the index.html file.
It is a library for building Single Page Application (SPA) similar to Angular with the difference that Angular in itself is a full fledged framework for building an application. With react we have a huge ecosystem of other libraries that support building application with React.
If you are interested to know the working of Angular app in a browser you can refer to my post -
How does an Angular App works in a web browser?
Structure of the react application
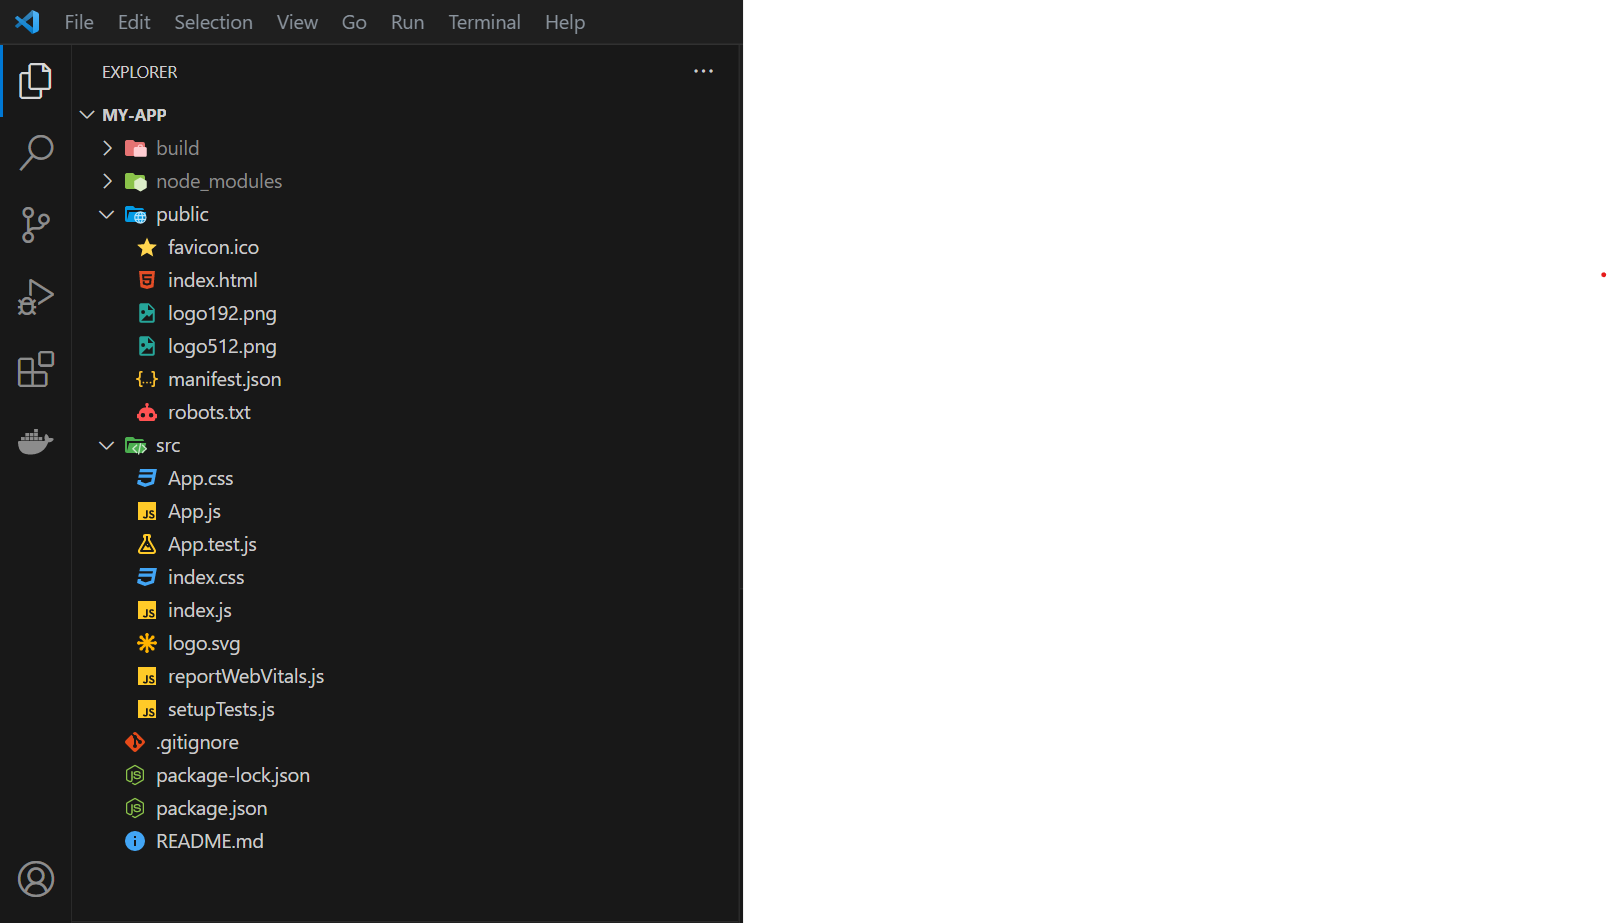
Let us first understand the structure of the application and the files present in our default app created by the create-react-app.
We can create a new react application with the following command.
npx create-react-app my-appNote that this would create a new react app with javascript by default however you can also create the new app with typescript. For this post we would be using javascript since we want to understand the internal working of the application.
Let us now build the app for production so that we can go through the file structure of the deployable components as well.
npm run buildReact Structure
-
build - The build folder gets created when we run the command
npm run build. This is the folder that serves our application on production. We will examine the files present inside this folder once we are familiar with the files in oursrcfolder. -
node_modules - This folder contains all the react dependencies, packages like react, react-dom and their transitive dependencies like webpack, babel, rxjs etc... that are needed to build and run a react project.
-
public - The public folder like any other front end applications typically contain static contents being used in our application. These static contents can be icons, images, scripts, configuration files etc... These files can be directly accessed with their names from the domain of the application.
Typically the assets which does not need to be bundled in the application are placed in this folder just like index,html in a react application. -
src - This folder contains all the application's source code. The source code typically contains react components, scripts, css etc... The content inside the src folder is bundled by bundlers like webpack etc...
As you can see that there is a src folder and few files outside of the src folder. The src folder contains the source code of our application and we will be looking into it later in this post. The main files outside the src folder are -
-
.gitignore - This file is present or created when the application source code is pushed a git repository. It contains the names of files or folder paths that should not be committed to the git repository. The environment configuration file typically .env files may contain some secrets which should not be committed to the repository and hence these files are mentioned in the .gitignore. Another important folder which is typically ignored while committing the code is the node_modules folder.
-
package.json - This file contain details about the dependencies of the application i.e the packages which is needed for the application to work. It also contains the scripts to run the application and project name and version details. Since the node_modules folder is not committed into the repository , the dependent packages are installed by using npm install using the package.json file.
-
README.md - This file is a markdown(.md) file which is used for documentation of the application. It mainly contains the instruction for setting up the project and other details.
Entry point of the React application
Now that we are familiar with the file and folder structure of a common react application it is time to understand the bootstrapping
of the application.
The code below represents the content of index.html file in the application.
index.html
<!DOCTYPE html>
<html lang="en">
  <head>
    <meta charset="utf-8" />
    <link rel="icon" href="%PUBLIC_URL%/favicon.ico" />
    <meta name="viewport" content="width=device-width, initial-scale=1" />
    <meta name="theme-color" content="#000000" />
    <meta
      name="description"
      content="Web site created using create-react-app"
    />
    <link rel="apple-touch-icon" href="%PUBLIC_URL%/logo192.png" />
    <!--
      manifest.json provides metadata used when your web app is installed on a
      user's mobile device or desktop. See https://developers.google.com/web/fundamentals/web-app-manifest/
    -->
    <link rel="manifest" href="%PUBLIC_URL%/manifest.json" />
    <!--
      Notice the use of %PUBLIC_URL% in the tags above.
      It will be replaced with the URL of the `public` folder during the build.
      Only files inside the `public` folder can be referenced from the HTML.

      Unlike "/favicon.ico" or "favicon.ico", "%PUBLIC_URL%/favicon.ico" will
      work correctly both with client-side routing and a non-root public URL.
      Learn how to configure a non-root public URL by running `npm run build`.
    -->
    <title>React App</title>
  </head>
  <body>
    <noscript>You need to enable JavaScript to run this app.</noscript>
    <div id="root"></div>
    <!--
      This HTML file is a template.
      If you open it directly in the browser, you will see an empty page.

      You can add webfonts, meta tags, or analytics to this file.
      The build step will place the bundled scripts into the <body> tag.

      To begin the development, run `npm start` or `yarn start`.
      To create a production bundle, use `npm run build` or `yarn build`.
    -->
  </body>
</html>
The index.html contains the div element with the id=root. This div is the container of the entire react app.
<div id="root"></div>How is the react app injected inside the div in index.html ?
We just learnt that our entire react application is rendered inside the div with the id="root" inside the index.html.
When the react application is build with the command npm build the bundler of the application combines all the code
present inside the scripts into bundle.js. You can examine this by monitoring the network tab in the web developer
console. The moment we browse the URL http://localhost:3000 the bundle.js is injected inside the index.html and the
same is rendered in the browser. The rendered html also contains the reference to bundle.js and the same is executed.
The scanshot below shows the same.
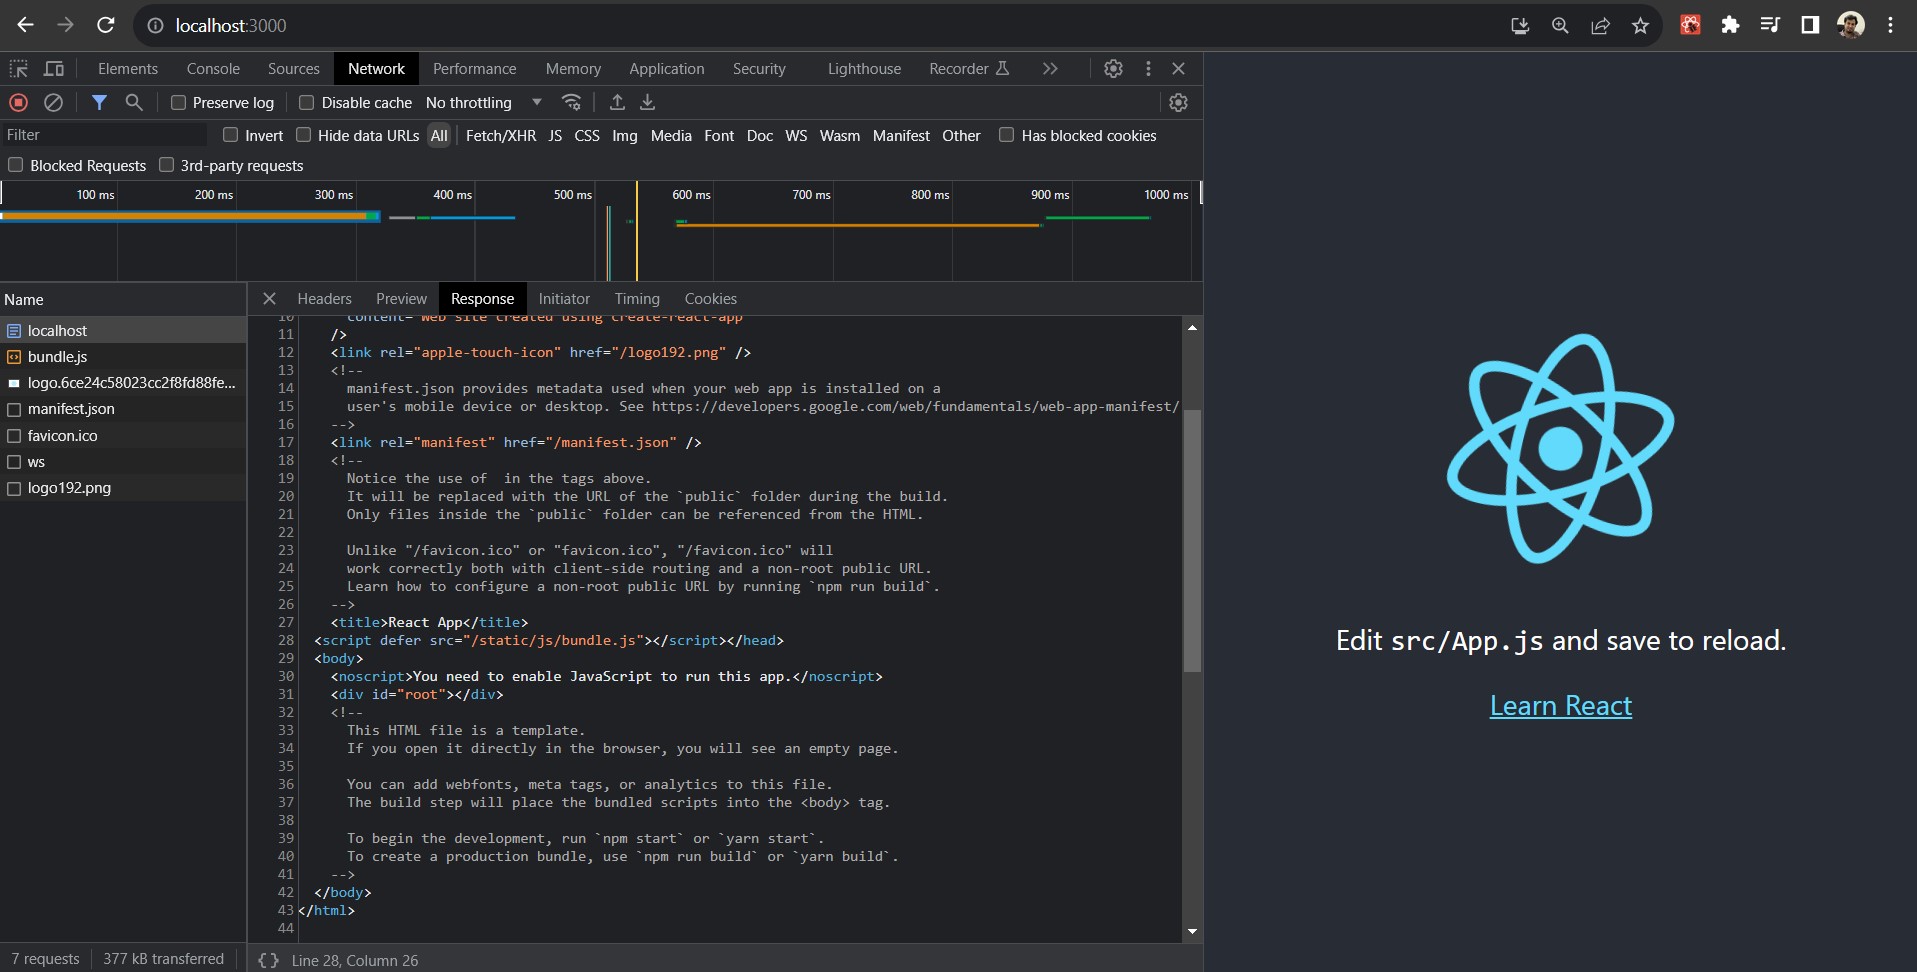
You can notice that the index.html code above does not contain the reference to the below code while the snapshot above shows the script tag in the response.
<script defer src="/static/js/bundle.js"></script>This script injection is done by the webpack bundler. As a side note if you want to understand the defer and async attributes in the script tag you might refer to my post below.
Async and Defer attributes in HTML
The index.js along with all other components are bundled in the bundle.js. Let us now undertsand the code present inside the index.js which is the entry point of the react application.
App.js
import React from 'react';
import ReactDOM from 'react-dom/client';
import './index.css';
import App from './App';
import reportWebVitals from './reportWebVitals';

const root = ReactDOM.createRoot(document.getElementById('root'));
root.render(
  <React.StrictMode>
    <App />
  </React.StrictMode>
);

// If you want to start measuring performance in your app, pass a function
// to log results (for example: reportWebVitals(console.log))
// or send to an analytics endpoint. Learn more: https://bit.ly/CRA-vitals
reportWebVitals();
In the code above the ReactDOM library is returning the reference of the root element which is the div
as seen earlier.
The render method is then called on the root to render the component inside the root. The App
component is made available through the App.js file which exports all the jsx code to render the component.
What is JSX?
The JSX stands for JavaScript XML. It is an extension to JavaScript often used in react to write HTML like code which is actually JavaScript code inside the React Components. This makes is easier for the developers to write user interfaces in a simple way which would otherwise become complex if written in pure JavaScript syntax.
The example below shows a JSX and its corresponding JavaScript code for better understanding.
JSX
const app = (
  <div>
    <h1>Welcome to My React App</h1>
    <p>This is a simple example of nested elements in JSX.</p>
    <ul>
      <li>Item 1</li>
      <li>Item 2</li>
      <li>Item 3</li>
    </ul>
  </div>
);
JavaScript
const app = React.createElement("div", null,
  React.createElement("h1", null, "Welcome to My React App"),
  React.createElement("p", null, "This is a simple example of nested elements in JSX."),
  React.createElement("ul", null,
    React.createElement("li", null, "Item 1"),
    React.createElement("li", null, "Item 2"),
    React.createElement("li", null, "Item 3")
  )
);
The example above is a pretty simple component however in practical our components can be complex in most cases and the JavaScript code can become more complex as well.
Building the react application
A react app is build using the npm run build command. Once the command is executed successfully
the build folder is created in the root directory of the project.
The build folder contains the following files and folder as seen in the snapshot below.
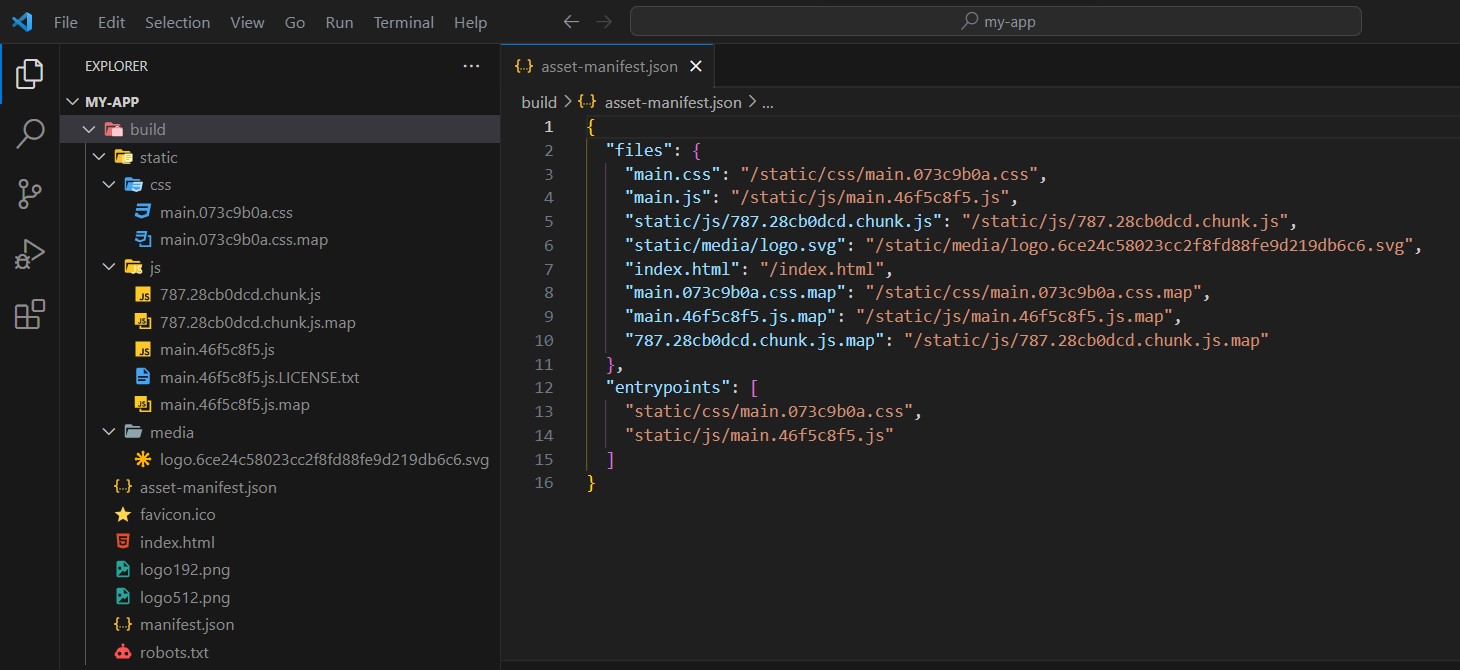
The build folder contains the bundles for css, javascript and media files.
The asset-manifest.json contains the details of the file bundles and the entry point of the application.
If you check out the index.html file in the build folder you would notice it has a reference to the css and script mentioned in the entry point of the asset-manifest.json.
index.html inside the build folder
<!DOCTYPE html>
<html lang="en">
  <head>
    <meta charset="utf-8" />
    <link rel="icon" href="/favicon.ico" />
    <meta name="viewport" content="width=device-width,initial-scale=1" />
    <meta name="theme-color" content="#000000" />
    <meta
      name="description"
      content="Web site created using create-react-app"
    />
    <link rel="apple-touch-icon" href="/logo192.png" />
    <link rel="manifest" href="/manifest.json" />
    <title>React App</title>
    <script defer="defer" src="/static/js/main.46f5c8f5.js"></script>
    <link href="/static/css/main.073c9b0a.css" rel="stylesheet" />
  </head>
  <body>
    <noscript>You need to enable JavaScript to run this app.</noscript>
    <div id="root"></div>
  </body>
</html>
I hope I am able to explain you the basic idea of how a react application works in the web browser.
Thank you for reading the post and see you in the next post.

Beyond React: Exploring Solidjs and Qwik for next-level web development